Setup
VIDEO GUIDE
Please watch the whole video BEFORE following the steps below.
The setup process is complex and things are easy to miss!
Setup will go through the following
- Enable the plugin
- Update DefaultEngine.ini
- Patch engine shaders
- Update Materials
- Blend meshes
Each step is required to setup the plugin.
Make sure you follow the setup guide word for word. Some things are easy to miss.
1. Enable plugin
- Enable MeshBlend plugin for project
- Restart editor
Editor Toolbar
You should see a B in the editor toolbar after restart. 
2. Update DefaultEngine.ini
- Open
<project>/Config/DefaultEngine.ini - Find the
[/Script/Engine.RendererSettings]section - Add the following console variables
r.AllowStaticLighting=False
r.Lumen.ScreenProbeGather.MaterialAO=0
NOTE
These changes are needed so that the plugin doesn't make meshes darker, since it's using the AO channel for data.
3. Patch engine shaders
Use the shader patcher tool to make sure the material Ambient Occlusion channel doesn't affect Unreals lighting while using MeshBlend.
- Open the MeshBlend toolbar and Readme
- Click Open Shader Patcher Tool in the bottom left corner
- Click Apply All
- Click Restart Editor
4. Update Materials
Example using a normal material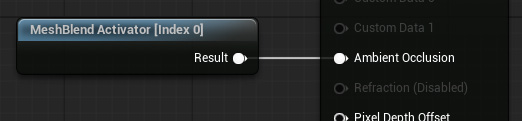
Example using a material that uses material attributes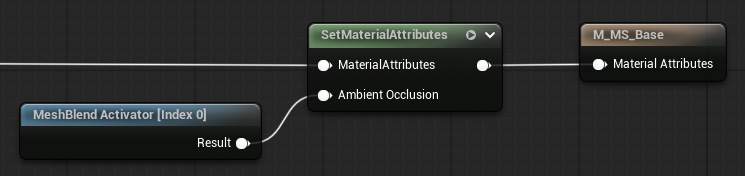
Each master material needs to be updated for a mesh to blend.
- Add the
MeshBlend_Activator [Index X]material function to your material and hook it up to the correct output channel. (Default is Ambient Occlusion) - Disconnect anything going to the AO in materials that are not blending (characters, items, etc). If not, they will show up in the MeshBlend debug view.
NOTE
- Make sure you connect the function to the final output channel of the material.
- For material layers ensure you set it up in the base material and not one of the blend layers.
Custom Primitive Data
The index on the material function corresponds to the Custom Primitive Data index it is supposed to use. If your material is already using CPDs you need to duplicate the material function and modify it to use an available index.
5. Blend meshes
Now that the project is setup you can make a mesh blend. There are multiple ways to achieve this.
For most meshes you want to use either the Mesh Assets or Mesh Actors approach. For landscape actor you need to use Static ID.
NOTE
If changing the blend has no effect, try clicking Refresh Actors in the toolbar.
If it's still not working, double check the following:
- The material is updated with the material function
- The earlier setup steps have been followed (r.AllowStaticLighting is 0)
A - Mesh Assets
VIDEO GUIDE
Shown at 2:32 in the Getting started video.
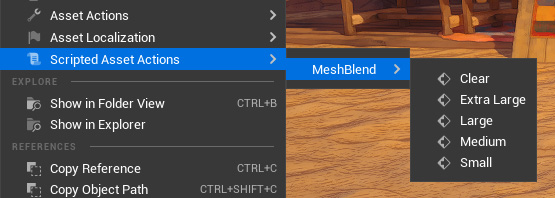
- Go to the mesh in your content browser that you want to blend
- Right click and choose
Scripted Asset Actions -> MeshBlendand choose a size - Any affected meshes in your level will automatically refresh
Asset User Data
This helper function stores the size on the mesh asset as a Asset User Data. You can also edit it manually in the asset.
B - Mesh Actors
VIDEO GUIDE
Shown at 4:12 in the Getting started video.
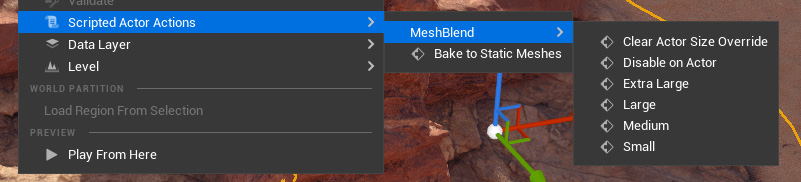
- Find the mesh in your level you want to blend
- Right click and choose
Scripted Actor Actions -> MeshBlendand choose a size
Actor Tag
This helper function stores the size on the mesh asset as a Tag on the actor.
You can also set these directly in the Actor or Component Tags
Tag names are:
AutoBlend_Small
AutoBlend_Medium
AutoBlend_Large
AutoBlend_ExtraLarge
AutoBlend_Disabled
C - Static blend ID on material
VIDEO GUIDE
Shown at 1:01 in the Getting started video.
NOTE
Only use this approach when you need to. In most cases it's usually better to set it on the mesh asset or actor directly.

You can set a static blend ID on a material. This is required by some meshes like landscapes and landscape grass. It can also be used to make multiple meshes appear like one mesh to the plugin, causing them to not blend between each other.
The static values are values not used by the activator.
NOTE
Meshes with the same static ID will never blend with each other.
So use this feature for stuff that either need a static ID (like landscape), or when you don't need the mesh to blend with other meshes of the same type. (like foliage where you want it to blend with the ground, but don't need each flower to blend with each other.)
- Open the material instance
- Set
MeshBlend / Use Static Valuetotrue
When togglingUse Static Valueoff you need to click Refresh Actors after saving the material instance - Set
MeshBlend / StaticAutoBlendIDto a corresponding value.
Static blend ID
Static blend IDs for landscape, foliage & special cases (Remember to divide by 255 in parameter input)
Examples: 2/255 or 5/255 give a small blend, 67/255 gives a medium blend, etc.
Small:       2-6
Medium:      65-69
Large:       128-132
Extra Large: 191-195

ALWAYS REMEMBER TO DIVIDE THIS NUMBER BY 255 WHEN INPUTTING IT
Blend ID
At it's core the MeshBlend shader works on a grayscale mask where each mesh has a value (0 - 255) that holds the blend size and unique ID.
The activator system ensures each mesh gets a value that is not overlapping with any intersecting meshes, since we only have a limited number of values to choose from.
Read more about this in Rules of Blending.
Static/Dynamic activation
Landscape and Landscape Grass are not dynamically activated and need to have a static ID set
It's also advised to use static IDs on foliage to improve performance.